SonarQube Installation in Linux 🐧
PostgreSQL and SonarQube Installation and Integration in RHEL.
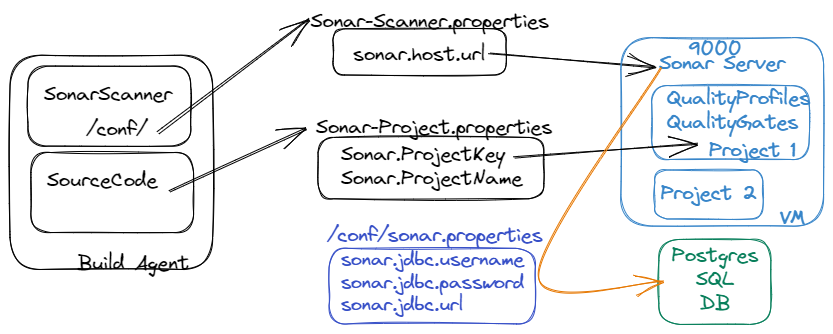 This Story illustrates the components with the color of the above image.
SonarQube/Cloud Installation, exploration and Integration (Azure DevOps) has been illustrated in three stories simultaneously.
This is Part 1 of 3.
Installing PostgreSQL on Red Hat Enterprise Linux (RHEL):
Add the PostgreSQL Yum repository to your system by creating a new file called
pgdg.repoin the/etc/yum.repos.d/directory:1
sudo vi /etc/yum.repos.d/pgdg.repoAdd the following content to the
pgdg.repofile:1
[pgdg13] name=PostgreSQL 13 for RHEL/CentOS 7 - x86_64 baseurl=https://download.postgresql.org/pub/repos/yum/13/redhat/rhel-7-x86_64 enabled=gpgcheck=01
Note: You can replace
13with the version of PostgreSQL you want to install, if it’s different.Update the package list and install PostgreSQL:
1
2
 sudo yum update
 sudo yum install postgresql-server
Initialize the PostgreSQL database:
1
 sudo postgresql-setup initdb
Start the PostgreSQL service and enable it to start on boot:
1
2
 sudo systemctl start postgresql
 sudo systemctl enable postgresql
That’s it! PostgreSQL should now be installed and running on your RHEL system. You can log in to the PostgreSQL server by running the following command:
1
2
 sudo -i -u postgres
 psql
From here, you can start creating databases and tables.
Installing SonarQube and integrating it with PostgreSQL.
Install Java 11 if it is not already installed:
1
 sudo yum install java-11-openjdk-devel
Download and install the latest version of SonarQube from the official website:
1
2
 sudo wget https://binaries.sonarsource.com/Distribution/sonarqube/sonarqube-9.3.1.45539.zip
 sudo unzip sonarqube-9.3.1.45539.zip -d /opt
Create a new PostgreSQL database and user:
1
2
3
4
5
6
7
8
 sudo su - postgres
 create user sonar
 psql
 ALTER USER sonarqube WITH ENCRYPTED password 'password';
 create database sonarqube;
 GRANT ALL PRIVILEGES ON DATABASE sonarqube TO sonar;
 \q
 exit
Note: Replace
passwordwith a strong password of your choice.Configure SonarQube to use PostgreSQL by editing the file
/opt/sonarqube/conf/sonar.properties:1 2 3
sonar.jdbc.username=sona sonar.jdbc.password=password sonar.jdbc.url=jdbc:postgresql://localhost/sonarquber
Note: Replace
passwordwith the password you set in step 3.Start SonarQube:
1
 sudo /opt/sonarqube/bin/linux-x86–64/sonar.sh start
Open the SonarQube web interface by visiting
http://your_server_ip:9000in a web browser.Log in with the default credentials (admin/admin) and follow the prompts to change the password.
That’s it! SonarQube should now be up and running and integrated with your PostgreSQL database.
You can now start analyzing your projects and improving your code quality.
Consider subscribing my substack.